
Hello good friends! Yes we’ve been absent for quite some time. During our holiday travels baby girl got very sick with respiratory issues and was hospitalized over New Years. She’s recovered nicely but I then proceeded to get sicker than sick (for over 10 days – no fun people) but rest assured we are all now healthy and well (as long as we have an inhaler close by for baby girl) and ready to start this New Year already! So many good things are in store this year. I’m speaking at ALT SLC this Friday on collaborations and…I have a book, PLAYFUL coming out in the FALL!!! Yippee!!! I canNOT wait to share this with you. It’s like my fourth baby (OK not really, I always hate it when people say that. But it does feel very close to my heart and I’m honored to have worked with so many AMAZING people on it. I’m just utterly giddy about it really. And rest assured I’ll post more on this later).
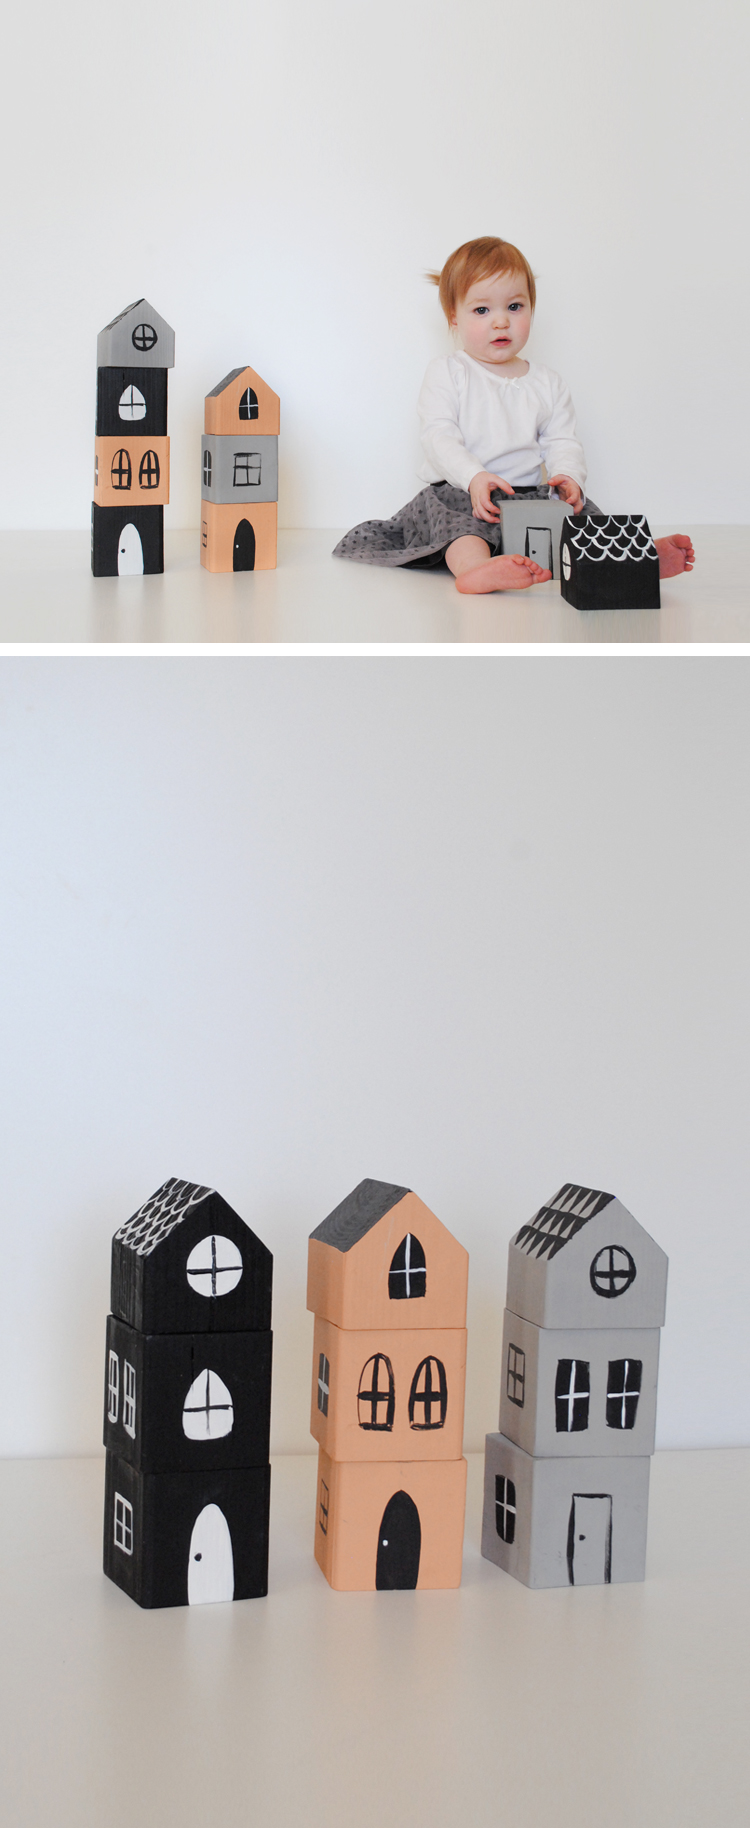
So let’s get started on this craft already, what do you say? I have had this idea of stacking house blocks for baby M for quite some time and decided I’d finally make them for Christmas. And lucky for me, and all of you, they are super easy to make and she loves them!
To make these blocks you’ll need:
- a 4×4 board at least 32″ long
- a saw of sorts (we used a chop saw)
- sand paper
- acrylic craft paints in at least three colors (non-toxic if making for a baby)
- beeswax polish (optional)
MAKING THE BLOCKS:
- Start by cutting nine 4×4 blocks
- For the three peaked roof blocks, with a pencil, drawn a line down the center of each block. Set your saw at 45 degree angle and begin your cut on the center of the line. Repeat for the other side of the roof. *note from Jon (who cut these for me): if there is a bow to the board or it’s not centered, your roof pitch will be different for each side.
- Sand the blocks
- Now for the fun part (for me at least)! Paint 2 square blocks and one roof block in each color, resulting in three house colors total. Once the base color is dry, go back over and create details such as doors, windows and roof tiles. Have fun with it!
- Seal with beeswax polish if you wish.

And fun is what we just keep on having! Little O actually joined in all the fun and insisted on making a high tower out of all the blocks. I loved his little high rise. The combinations are truly endless and I love what they look like in any configuration. And baby M? well she’s content to gnaw and knock them over…again…and again…

And if you make some stacking blocks of your own please do share! I’m so excited about the deco possibilities and can’t wait to see what ideas you might have. I went pretty simple with the color scheme and design on these as I wanted them to mix into her nursery decor in a seamless and modern way but these would also be lots fun with tons of color.
I saw this on pinterest and really love it! I think i’m going to make them too. I love the colors and patterns you choose!
thanks Annis! do make them and let me know how they turn out! xo Mer
What a cool idea!
Muy bueno para estimular y facil de hacer
Such a lovely project!
Without reading the steps and only looking at the pics I thought these blocks were made of cardboard boxes, which I think I will try. They probably won’t hold themselves together as well as wood but I love the idea x
cardboard would be cool too! you could make them out of tissue boxes (like my tissue box houses from Christmas two years ago: http://mermagblog.com/2012/12/18/christmas-village-with-duct-tape-and-tissue-boxes/). Would make for a great thrifty craft, without having to leave your home! And they wouldn’t hurt when toppling over. 😉 Let me know if you do it! xo Mer
I love this project. I am glad that you and your daughter are better. Terrible start of the new year but with the news of your book it seems like its going to get better 😉 looking forward to it already!
thank you Cecilia for your kind comments. It’s so nice to have her feeling better (although most definitely prone to weezing). xo Mer
Your daughter looks amazing sitting next to those blocks. These reminded me of a show I watched when I was still a child. It was a town made of clay. Everyone, the houses were made of clay, I simply loved that show. Thanks showing this amazing craft
ooh that show sounds so nostalgic and happy. thanks for sharing! xo Mer
Nice toys, my nephew would love them
love love love the colors you chose as well…
im thinking no saw, might have to search through the recycle for some
cardboard ;D thanks for the inspiration !
yes recycled cardboard would be great for these too! xo Mer
Love this! I think I’m going to have to make these for the twins… I love how simple the colours and designs are.
Thanks Colleen! Yes, make them for your littles. So fun. So glad you like the colors. It’s always hard to decide whether to go more colorful or to strain back a bit. I find simplicity usually always works best. xo Mer
So cute! I have one question–are these safe for baby to put in her mouth? (Because I know it’s going to happen no matter what…)
yes it’s just depends on what paint you use. Use a child safe paint and you’re all set. xo mer
Thanks for the idea! My wife thought this would be a great birthday present for our nice. In absence of a chop saw, I’ve been hand-sawing a 4×4 all day. Maybe I’ll have it done by next year’s birthday.
oh so excited. You’ll love them. totally worth it 🙂
xo Mer
Came across this project on Treasures & Travels! So great! I have lots of littles in my life that I would love to make these for, primarily my future little niece or nephew that is currently baking. I think they’d make adorable nursery decor until he/she is old enough to play with them. Love love love this idea!!!
Oh I hope you love them as much as we do when you make them! xoxo Mer
Such sweet little houses! I love how they stack, and the colours are amazing!
https://busybeeblogweb.wordpress.com
Love the idea – Could your daughter pick them up herself, how heavy were they to play with. Any injuries from falling block towers? Thinking of making this as a gift.
You can find hallow blocks at the craft store that are lighter but then the roof top would have to be square.
We didn’t have any injuries from them falling over but I will say we had to make sure to tell older brothers to not throw them! ha! Which they were good about.
xo
Mer