
As evidenced in our cardboard stable and now our DIY llama’s we’re definitely soaking up the country and letting every last ounce of it inspire us. I remember as a young girl I was completely intrigued by llamas. When walking home from school I would often pass by a field where a couple of these seemingly bizarre yet stunningly regal creatures resided. To me they looked like they could have stepped off of another planet and then somehow found their way to ours. Needless to say, I’m still in love and still very intrigued by these creatures.
While recently sifting through a vintage craft book I came across a llama made from an oatmeal box and new right away that we had to make our own crafty version of this fun, long necked, leggy, pack animal. We had a few cardboard paper tubes lying around so we used those instead of an oatmeal box (which worked great as we wanted more than one).

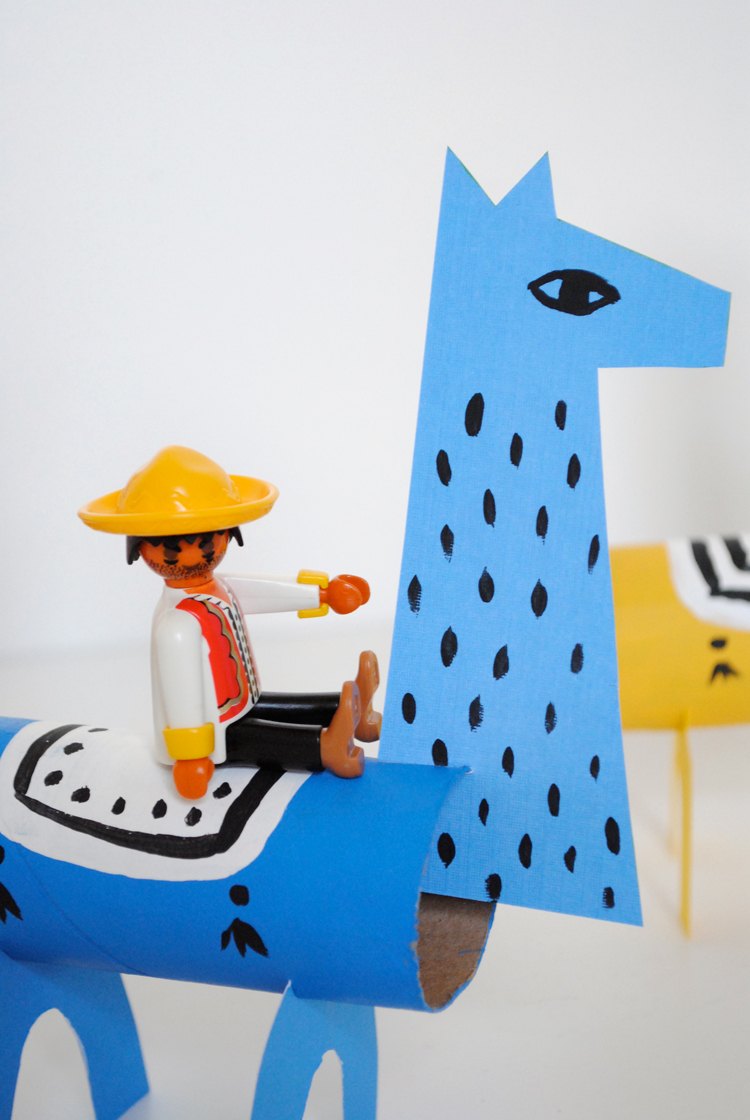
To make your very own set of DIY llamas from paper tubes, gather the following supplies:
- Thick colored card stock for the head and legs (large paint chips or cereal boxes would also work)
- cardboard paper tubes
- acrylic craft paints
- an X-acto knife for cutting small slits

To create the llama:
- Cut out llama head and two sets of legs from thick card stock (If using fiber board [aka a cereal box] paint it all one color and let dry)
- Paint on eyes and hair to llama’s head and neck
- Paint cardboard paper tube all one color and let dry
- After cardboard tube is painted and dry, paint on a shawl saddle of sorts. Have fun decorating your shawl with shapes and bold graphics. Let this dry.
- Once everything is dry you are now ready to create your slits to assemble your llama.
- On the back side of the llama’s neck, cut a small slit a little less than half way into the neck at about 3/4 the way down the neck.
- Insert neck onto one end of the cardboard paper tube (I ended up using a bit of hot glue to keep the head from moving around too much but if you use fiber board you shouldn’t have this problem)
- Now cut a few slits on the bottom of the cardboard paper tube for the legs.
- Insert your paper legs into the bottom slits you just cut.
- Your llama is now complete! Repeat this process for as many llamas you desire to make and play with!


And play is just what we did. I love that the kiddo’s toy figures can ride on these llamas and I equally love that Little O insisted on having a “llama train”.
And when the littles are done playing, they make for some nice room decor. I mean who doesn’t want paper tube lamas in bright colors lined up in their bookshelf? OK, I do. And perhaps I’m the only one, but they make me happy whenever I see them upon entering a room.

And a word about this little kiddo. I thought I was a pretty big toy lover, but man oh man is this kid is obsessed with toys.

Particularly one’s that he’s seen on screen somewhere, so I have to work with him on helping him to learn the fine art of unique and well crafted handmade toys. He’s oh about 1/3 of the way there. In truth he’s really all about the story behind the toy. But if it’s a toy of any sort, he’ll love it. He feels deeply for his toys. They are his playmates. His creations. His friends. He becomes them. He’s truly living the the real life Toy Story and I love this about him. I have mom dreams that some day he’ll grow up to be a toy maker or at least a character designer for animated films, but we’ll see if this obsession sticks. For the time being, I’m enjoying this little soul and his obsessions and our little time we have together at this fleeting time of life…

Love this! We’re going to try it this weekend!
oh have so much fun! xo Mer
These one are totally rad but I have a question for you, Mer. Having a boy myself, how long do these last;)? My 4 year old son would probably destroy them in one day. I am just curious if the same happens with your kids or if they treasure them dearly. Odd question, I know:)).
Hi Lena,
Great question. Definitely no treasuring dearly so much on their part, more on mine. I let them play for a bit creatively with the toys we’ve made together but if it starts to turn into destruction mode I might pull back and set the craft aside for later. It all depends on how I’m feeling. The younger they are the harder this is so I try to mix in a number of messy/destruction crafts so that they can get that out of their system before we do something that I want them to take more care of. I try to teach a general level of care for our creations but yes, they are boys so they do like to go crazy with it. We’re far from perfect over here! But I do think the boys like to make these things and are slowly learning the value of things made over things bought.
Thank you, Mer, I totally agree it’s a boy thing!
These are adorable! So.much.fun.
I love them sooooo much Thanks for shareing it
We are a gaggle of volunteers and opening a brand new scheme in our community. Your site provided us with valuable info to work on. You’ve performed an impressive task and our whole community can be thankful to you.
Thank you for this darling craft. I teach Spanish camps in the summer, and the kids SO enjoyed making these today. The biggest benefit?… when they finished, they immediately starting using them to converse with each other’s llamas in Spanish. One group even did a little play with them in a puppet theater. One tip that one of my older students figured out… if she notched the top of the legs in the front, she could wedge the bottom of the neck into that wedge, and then the head didn’t lean to one side. Brilliant!
Looking for more llama crafts for kids? Check out these adorable llama finger puppets from I Heart Crafty Things or this amazing llama costume from Mer Mag Blog.