
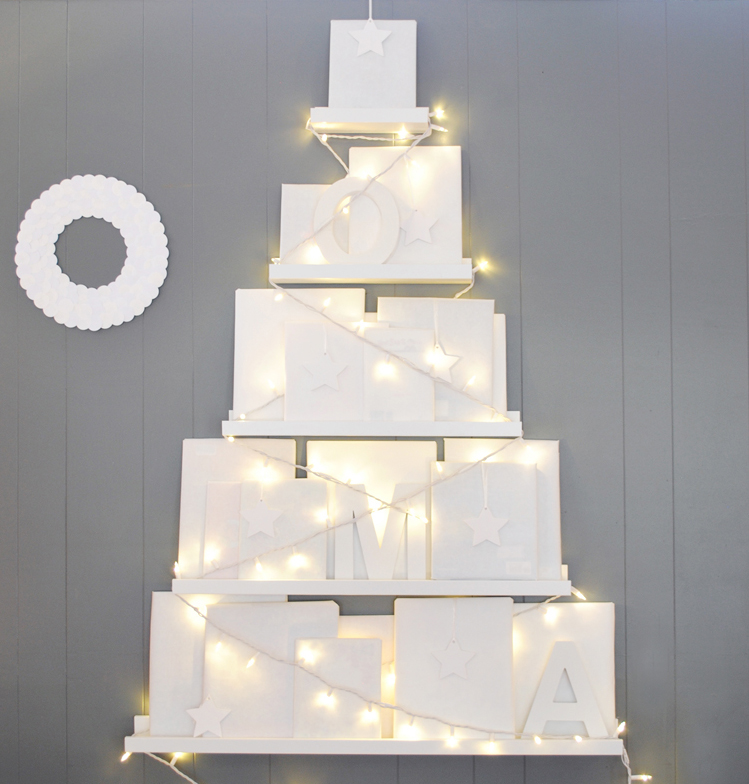
I wanted to do something different with our Christmas tree this year and after a recent trip to IKEA, I knew just what to do. Using IKEA’s Ribba Picture Ledges Jon and my brother Kenton (who was in town for Thanksgiving) helped to make my vision come to life.

was hoping to post on this much earlier but with baby girl in the hospital all week last week (with RSV – she’s doing much better) things got put on the back burner a bit. But let me tell you we’ve loved having this tree up (the boys too! I was afraid the wouldn’t think it was as cool as a real tree but they tell everyone about it wherever we go!) and it was just the perfect thing to calm our hearts when coming home.

To make this tree we purchased three 45.25″ RIBBA ledges, two 21.75″ ledges and one of the small ones for the very top. Because of course this would be temporary, I decided to use Command Strips to put it up. Worked like a charm. We laid out all of our shelves to decide just how large we wanted this. In the end we came up with the following measurments:
top shelf: 9″
2nd shelf: 15.5″
3rd shelf: 23″
4th shelf: 30.5″
5th shelf: 38″
6th shelf: 45.25″
The cuts were simple and quick to make. To install, we took a look at our wall and determined that we wanted 12″ between each shelf. Then using our Command Strips we put our tree up. We used a total of 6 large strips for the lowest shelf, 4 for the next one up and so on, adjusting according to the size of the shelf and what we wanted it to hold.

We then got out our holiday trimmings and decorated our new tree! The boys love it! We just have to advise them not to play with their toys on the shelves too much (yeah right! There’s a good reason why the styling is off a bit on the bottom shelf.
I also recently tried another variation by adding all of our books from our advent to the shelves (something I actually had in mind from the get-go). I’m super happy with the results but I will advise that if you are trying to go this route, I might secure the shelves to the wall with screws as the Command Strips might not be quite strong enough.
This project was so much quicker than I had even originally imagined so you definitely could still do it this holiday season. There are so many different ways to go with this and the decorating options are endless. I already have an entirely new deco scheme planned for next year! (or maybe I’ll do it this year…you never know what mom’s going to rearrange around here).
This was so cool!! Brilliant idea! have a merry merry christmas!
Veronika
You are amazing Merrilee! This is just possibly the most clever idea ever! Sending your little one get well wishes and hugs for your whole family. xo Ez
thank EZ! you are too sweet.
xo
Mer
Gorgeous.
Lovely
I’m so glad to hear your baby is doing better. What a clever and non-traditional way to make a Christmas tree. Soooo very mod! I really like it. Glad to hear the boys like it too. I love your little paper caroler ornament. Your illustrations make me smile. Happy holidays to you and all your blog readers!!!!!
Merrilee, you’re a genius! The lights and your illustrations really make it. It’s just so, so, so cute.
This is such a super cute idea!! I actually just made my own christmas tree this week. Stop on by and check it out 🙂
Melissa
http://shakeshakee.blogspot.com
so cute Melissa. thanks for the link!
Love love love!
So cute! Did you use battery operated lights? I don’t see the cord going to a socket anywhere.
Battery operated lights are a great way to go! but the cord isn’t too bad either (we just didn’t like what it looked like in the pics ;)).
This is a GREAT idea! I already decorated my tree, but I keep this in mind for next year for sure! Liz
I adore everything about this! 🙂
Love this idea. So are you saying you did not put any holes in the wall and you simply hung it with command strips instead? They could hold the weight of the 45.25″ shelf? I am hanging some IKEA RIBBA picture shelves in my daughter’s room and would love to avoid holes in the wall. Do you think command strips would hold it in place and withstand the weight of a few children’s books?
the command strips worked great so long as I didn’t put a lot of weight on the shelf. When I put the books up things started to look precarious so I took them down. If you only want 2-3 books for show, the command strips might work…any more than that and it’s probably going to fall at some point.
xo
Mer
Hi there, I just happened to stumble upon your lovely blog when doing a search for cutting Ribba ledges (for our children’s art wall); you are super creative and talented! May I kindly ask what your husband and brother used to make the cuts on the ledges and also what they did to disguise the cut edge?
Thanks a bunch,
Linde
Hi Linde! Jon and my brother cut down the wood with a chop saw. You can then sand the ends and paint it white with satin.
Hi Merrilee,
Thanks so much for answering my query and your great suggestions! Our neighbour is kind enough to let me borrow his miter/chop saw while he supervises; I look forward to starting this project next weekend when the kids are napping!
Best wishes,
Linde